Avenue Decor
When tackling the task of cutting UV wall panels, achieving precision is crucial. One wrong move can lead to cracks that ruin the coating, affecting both aesthetics and functionality. According to industry expert John Miller, "Proper techniques can make all the difference when cutting UV wall panels." He emphasizes the importance of using the right tools and methods to preserve the integrity of the coating.
During the cutting process, it's vital to consider several factors. The temperature of the environment can affect the panels' material, leading to unexpected cracks. Using a sharp blade and cutting slowly can also help in achieving a clean edge. However, even experienced professionals occasionally face challenges with less-than-perfect results.
Each project is unique, which means one technique may not work for every situation. It's essential to adapt your approach based on the specific conditions you are dealing with. Understanding "How to cut UV wall panels without cracking the coating?" will require practice and attention to detail. With persistence and the right knowledge, you can achieve a smooth finish every time.
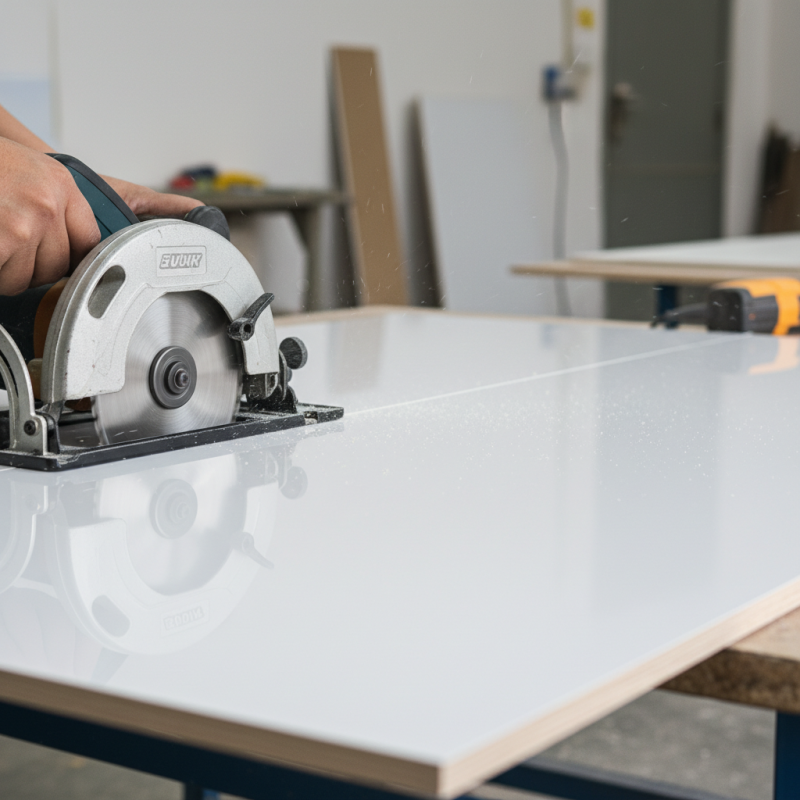
Choosing the right tools for cutting UV wall panels is crucial. UV wall panels are popular for their durability and aesthetic appeal. However, achieving a clean cut without damaging the coating requires precision. A recent industry report indicates that improper cutting can lead to significant visual defects, affecting about 30% of installations. The right tools can minimize this risk.
For optimal results, consider using a circular saw with a fine-tooth blade. This type of saw can produce cleaner and more accurate cuts. A jigsaw can also be useful for detailed shapes. It's essential to avoid worn or dull blades, as they can cause chipping. When measuring, always double-check your marks before cutting.
Tips: Always wear safety goggles while cutting. This protects your eyes from debris. Use clamps to secure the panel. This prevents movement, which can lead to crooked cuts. If you notice cracking, reassess your cutting technique. Sometimes, slower speeds yield better outcomes. Remember, high quality tools and patience are key components in achieving the perfect cut.
When preparing UV wall panels for a clean cut, start by selecting the right tools. A sharp utility knife works well. Consider using a straightedge to guide your cuts. This prevents mistakes and ensures a smooth line. Proper tools enhance precision.
Before cutting, clean the surface of the panels. Dust and dirt can lead to uneven cuts. Wipe the panels with a soft cloth. Make sure the workspace is well-lit. Bright light helps you see the panel clearly.
Take your time when measuring. Mistakes here might cause problems later. Depending on the panel's thickness, apply steady pressure during the cut. Go slow to avoid cracking the coating. Each cut demands focus. If you feel uncertain, practice on scrap material. This builds confidence and skill. With careful preparation, achieving clean cuts becomes much easier.
Cutting UV wall panels can be tricky, especially if you want to avoid damaging the coating. Using the right techniques is crucial for a clean finish. This task often requires precision and patience. A steady hand can make a significant difference in the final result.
One effective method involves scoring the surface before cutting. Use a fine-tipped utility knife to lightly score the panel where you intend to cut. This reduces stress on the coating. Make sure to apply even pressure. Remember, rushing can lead to cracks. Take your time for a better outcome.
Tips: Always wear protective gear. Safety glasses and gloves are essential. It’s easy to overlook safety when focused on your work. Also, test your cutting technique on a scrap piece first. This practice helps refine your approach and highlights potential issues.
Another technique is to use a straight edge or a guide. This provides a clear line to follow and helps stabilize your cut. It’s simple yet effective. Don’t underestimate the power of a well-placed guide. If the cut doesn’t go as planned, consider adjusting your technique. Each attempt offers insights for improvement.
| Technique | Description | Tools Required | Tips for Success |
|---|---|---|---|
| Scoring and Breaking | Using a utility knife to score the panel, then snap it along the score line. | Utility knife, straight edge, safety glasses | Score lightly at first, apply pressure slowly during breaking. |
| Circular Saw with Fine-Toothed Blade | Cutting with a circular saw at a slow speed to avoid melting the coating. | Circular saw, fine-toothed blade, clamps | Keep the blade cool with water spray while cutting. |
| Miter Saw | Using a miter saw ensures clean cuts on angled edges without damaging the coating. | Miter saw, fine-toothed blade, measuring tape | Make sure the blade is sharp for precise cuts. |
| Hand Saw | Using a hand saw allows for greater control and less risk of vibration. | Hand saw, measuring tape, straight edge | Saw at a steady pace to maintain control and reduce splintering. |
| Dremel Tool | Using a Dremel for intricate cuts and adjustments for detailed work. | Dremel tool, cutting bits, clamps | Work slowly and let the tool do the cutting to avoid overheating. |
Cutting UV wall panels can be a delicate task. Proper technique is key to ensuring the coating remains intact. Begin by gathering the right tools: a fine-toothed saw or a utility knife, a straightedge, and safety gear. Measure carefully and mark the cutting line with a pencil for precision. This can minimize mistakes, which are crucial in maintaining the panel's integrity.
Once set, place the panel on a flat surface. Firmly secure it to avoid any movement during cutting. If using a saw, score the surface gently at first. This helps to create a groove, reducing the chances of cracking. Apply steady and even pressure while cutting. Remember, go slow; hasty cuts can lead to disastrous results. After cutting, inspect the edges. Any rough spots can be smoothed down with fine sandpaper.
Reflecting on the process, many find that patience is vital. Rushing can lead to uneven edges or visible damage to the coating. Take your time and check your work at each step. The goal is a clean cut that preserves the aesthetic appeal of the UV wall panels.
When cutting UV wall panels, ensuring a smooth edge is crucial. Even minor imperfections can impact appearance and durability. One effective technique is to score the panel with a utility knife. Applying steady pressure is key. Make multiple shallow passes to avoid cracking the coating. This method requires focus and practice. Each cut can bring new challenges, so don't hesitate to refine your technique.
After scoring, snapping the panel along the line can create a clean edge. If the edge isn't perfect, sanding can help. Use fine-grit sandpaper to gently smooth out any rough spots. Be careful not to sand too aggressively. This can lead to further damage. Testing on a scrap panel first can help to build confidence.
Adding a finishing touch applies a protective layer. Consider using clear sealants to enhance durability. Every application can yield different results, and not every finish will come out as expected. It’s essential to assess the coating's condition, as varied surfaces react differently to treatments. Reflecting on your approach can lead to better outcomes in future projects. Each experience is a learning opportunity.
: A circular saw with a fine-tooth blade and a jigsaw are recommended for precise cuts.
Dull blades can cause chipping and lead to visual defects in the panel's coating.
Use clamps to secure the panel firmly to avoid crooked cuts during the process.
Reassess your cutting technique. Slower speeds might yield better results and reduce cracking.
Score the panel gently and make multiple shallow passes before snapping it along the line.
Use fine-grit sandpaper lightly to smooth out rough spots, avoiding aggressive sanding.
Inspect the edges after cutting. Reflect on the process to improve future cutting techniques.
Always double-check your measurements. Precise markings can minimize mistakes during cutting.
Patience is vital; rushing can lead to uneven edges and damage to the coating.
Yes, using clear sealants can enhance durability, but results can vary by application.
When considering "How to cut UV wall panels without cracking the coating?", it’s essential to start with the right tools to ensure a clean and precise cut. Begin by preparing the panels properly, which involves measuring and marking the cut line accurately. Employ techniques such as scoring the surface lightly before making a deeper cut to minimize damage to the coating.
The cutting process should follow a systematic approach: secure the panels properly, use steady pressure, and make clean cuts to preserve the integrity of the coating. After cutting, finishing touches are crucial for ensuring a smooth edge, which may include sanding or sealing the cut areas. By following these steps, you can achieve effective results while maintaining the appearance and durability of UV wall panels.